My 10K Apart entry: Filterrific
 My entry for the 10K Apart contest is now up. It's a small image manipulation app showing some of the same functionality available in my Pixastic library, but this time squeezed into a 10K web app. Check it out and be sure to vote! Cheers.
Read more...
 My entry for the 10K Apart contest is now up. It's a small image manipulation app showing some of the same functionality available in my Pixastic library, but this time squeezed into a 10K web app. Check it out and be sure to vote! Cheers.
Read more...
A few Pixastic updates
A few minor updates to Pixastic before I begin working on the next edition of the photo editor (the one that will eventually also work as a Ubiquity command). Undo/revert functionality, a color histogram action, and more..
A few people have requested a way to revert the image back to the original, so Pixastic now remembers the original image and lets you call
After processing an image, the options object now holds the resulting canvas in a property called
The options object can now also take a boolean
Bill Mill did some color histogram code for his article series on canvas image processing. This code has now been integrated (and slightly modified for consistency with the brightness histogram). Thanks Bill!
Lastly, I made few performance improvements in some of the actions (brightness/contrast, color adjust, desaturate). More will come as I get around to it. Read more...
A few people have requested a way to revert the image back to the original, so Pixastic now remembers the original image and lets you call
Pixastic.revert(img) to undo all the processing done on an image. It's important to know that the resulting image from a process() call is not the same element as the one passed to the process() call. Pixastic creates a new canvas element which means that most properties, attributes and events are not carried over to the new canvas element. For instance, if you are making a mouseover/out effect on an image, you'll have to listen for the mouseout event on the new element after calling process() in the mouseover event. The example on the introduction page has been reworked to use this.
After processing an image, the options object now holds the resulting canvas in a property called
resultCanvas.
Example:
  var options = {};
  Pixastic.process(image, "action", options);
  options.resultCanvas; // <- holds new canvas
The canvas is also returned by the Pixastic.process() method itself, but only if the image is completely loaded by the time of the call (if it is not, the actual processing is deferred until the onload event on the image)
The options object can now also take a boolean
leaveDOM option that will leave the DOM untouched after processing. If not set (or set to false), Pixastic behaves as it did before and replaces the original image with the new canvas element. The new revert() method will also put the original image element back in the DOM, if possible.
Bill Mill did some color histogram code for his article series on canvas image processing. This code has now been integrated (and slightly modified for consistency with the brightness histogram). Thanks Bill!
Lastly, I made few performance improvements in some of the actions (brightness/contrast, color adjust, desaturate). More will come as I get around to it. Read more...
Photoshop blend modes with Pixastic
 I've added a new action to the Pixastic library called "blend". This action lets you blend two images using different blend modes like the ones available in Photoshop (multiply, screen, exclusion, etc.).
Check the demo page to see it in action.
Below are shown all the blend modes included. The images used are:
Base image:

Blend image:

So, basically all the Photoshop modes sans "dissolve" and the HSL based ones (which I guess I'll add at some point as well).
Read more...
 I've added a new action to the Pixastic library called "blend". This action lets you blend two images using different blend modes like the ones available in Photoshop (multiply, screen, exclusion, etc.).
Example usage
var img = new Image();
img.onload = function() {
 var blendImg = new Image();
 blendImg.onload = function() {
  Pixastic.process(img, "blend",
   {
    amount : 1,
    mode : "multiply",
    image : blendImg
   }
  );
 }
 blendImg.src = "blendimage.jpg";
}
document.body.appendChild(img)
img.src = "myimage.jpg";
The image on which you apply the action will be considered the base image when blending. You can use either an img element or a canvas element for the "blend image". It expects the images to be the same size but will simply crop the blend image if it's too large or leave untouched areas if it's smaller then the base image.Check the demo page to see it in action.
Below are shown all the blend modes included. The images used are:
Base image:

Blend image:

Blend modes
So, basically all the Photoshop modes sans "dissolve" and the HSL based ones (which I guess I'll add at some point as well).
Read more...
More Pixastic actions
A few new actions (Color Adjust, Mosaic, Pointillize and Solarize) are now available for the Pixastic library (if you didn't catch the first post about it, go here), bringing the total count to 25.
The new effects are as follows:
Color Adjust
This simply lets you add/subtract from each color channel (red, green and blue) of the image. Demo page.
Mosaic
Creates a pixellated effect. Demo page.

Pointillize
Paints the pictures with circular... points. Demo page.

Solarize
Creates a solarisation effect by inverting all colors that are above a certain treshold. Demo page.

All of these need image data access, so Firefox, Opera 9.5+ and WebKit nightly only. Got a few more coming in the not so distant future.
Read more...
The new effects are as follows:
Color Adjust
This simply lets you add/subtract from each color channel (red, green and blue) of the image. Demo page.
Mosaic
Creates a pixellated effect. Demo page.

Pointillize
Paints the pictures with circular... points. Demo page.

Solarize
Creates a solarisation effect by inverting all colors that are above a certain treshold. Demo page.

All of these need image data access, so Firefox, Opera 9.5+ and WebKit nightly only. Got a few more coming in the not so distant future.
Read more...
Pixastic - Now a JavaScript image processing library
 So, a while ago I played around with applying different effects to images by using the canvas element. The result was a small library that I posted about here. A bit later, I took some of that code and turned it into a small image editing application that I dubbed Pixastic,
the most web 2.0 name I could think of. Now I've ripped out the filtering parts and turned it back into an image processing library, also called Pixastic.
You should check out the Pixastic site if you want the whole low down on what it does, but here's a quick summary. The Pixastic library allows you to apply a variety of effects or "actions" on an image. For most of the effects, the magic is done by painting the image on a
 This new library has its own site at http://www.pixastic.com/lib/ (the editor has been moved to http://editor.pixastic.com/).
There are live demos of all the actions in the documentation, as well as descriptions of parameters and all that.
Also, unlike the previous library, this code freely available under the terms of the MIT license.
Check it all out here
All feedback, bugreports, contributions, etc. are of course much appreciated.
Read more...
 So, a while ago I played around with applying different effects to images by using the canvas element. The result was a small library that I posted about here. A bit later, I took some of that code and turned it into a small image editing application that I dubbed Pixastic,
the most web 2.0 name I could think of. Now I've ripped out the filtering parts and turned it back into an image processing library, also called Pixastic.
You should check out the Pixastic site if you want the whole low down on what it does, but here's a quick summary. The Pixastic library allows you to apply a variety of effects or "actions" on an image. For most of the effects, the magic is done by painting the image on a
canvas element and then accessing the raw pixel data via the getImageData and putImageData methods. Currently available actions are:
- Blur
- Brightness/Contrast
- Crop
- Desaturate
- Edge Detection
- Emboss
- Flip Horizontally/Vertically
- Glow
- Histogram
- Hue/Saturation/Lightness
- Invert
- Laplace Edge Detection
- Lighten
- Noise
- Posterize
- Remove Noise
- Sepia
- Sharpen
- Unsharp Mask
- Color Adjust
- Mosaic
- Pointillize
- Solarize
Pixastic.process(
 document.getElementById("myImage"),
 "blur",
 {amount:0.5}
);
And with CSS classes the same would be done like this:
<img src="myimage.jpg" class="pixastic pixastic-blur(amount=0.5)" />In the
canvas-less IE, the effects are applied (when possible) with the proprietary IE filters. There's also some basic jQuery support that you can read more about on the Pixastic site.
 This new library has its own site at http://www.pixastic.com/lib/ (the editor has been moved to http://editor.pixastic.com/).
There are live demos of all the actions in the documentation, as well as descriptions of parameters and all that.
Also, unlike the previous library, this code freely available under the terms of the MIT license.
Check it all out here
All feedback, bugreports, contributions, etc. are of course much appreciated.
Read more...
Pixastic update - zoom, view source
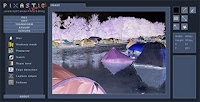 A small update to my online JavaScript photo editing app, Pixastic.com.
First, it is now possible to zoom in and out using either "Z" and "X" or the mousewheel. This also allows larger images to be loaded, so now the filesize limit is 4 MB and 2048x2048 px. You can also use the arrow keys to move the image around.
Second, the "Load from URL" function is still rather handicapped, since my hosting service is blocking most outbound connections, but you can now load pictures from Flickr, Photobucket, Picasa Web and Facebook. (Using rightclick and copy/pasting the address). At some point I'll probably look into some real integration with services like these.
Third, I've added the possibility to easily view the JavaScript source of all the different image actions. If you press shift while clicking on an action (like "Adjust" -> "Desaturate"), a small window will appear with the source. Alternatively, there is a small link in the action dialogs that you can click (only works for the actions with dialogs, obviously). You can also do this (shift-click) with the tool buttons on the right.
Try it out here
And if you didn't catch it the first time, this blog post explains a bit more about Pixastic. Read more...
 A small update to my online JavaScript photo editing app, Pixastic.com.
 First, it is now possible to zoom in and out using either "Z" and "X" or the mousewheel. This also allows larger images to be loaded, so now the filesize limit is 4 MB and 2048x2048 px. You can also use the arrow keys to move the image around.
Second, the "Load from URL" function is still rather handicapped, since my hosting service is blocking most outbound connections, but you can now load pictures from Flickr, Photobucket, Picasa Web and Facebook. (Using rightclick and copy/pasting the address). At some point I'll probably look into some real integration with services like these.
Third, I've added the possibility to easily view the JavaScript source of all the different image actions. If you press shift while clicking on an action (like "Adjust" -> "Desaturate"), a small window will appear with the source. Alternatively, there is a small link in the action dialogs that you can click (only works for the actions with dialogs, obviously). You can also do this (shift-click) with the tool buttons on the right.
Try it out here
And if you didn't catch it the first time, this blog post explains a bit more about Pixastic. Read more...
Pixastic : Photo editing with JavaScript and canvas
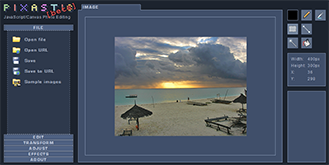
I wanted to see how far I could take the canvas image effects and the result, which is still very much a work in progress, is pixastic.com, a JavaScript/Canvas image editing application.
Now, it's not a complete photo manipulation and editing suite, capable of doing everything you need, nor does it aim to be that. There is no substitute for Photoshop. So, first and foremost Pixastic will be my playground for experimenting with image manipulation, and I suppose also a showcase of how the canvas element can be used to edit photos. Every bit of manipulation is done on the client side with no plugins, using just JavaScript and the functionality present in the canvas implementations of the supported browsers. Now, even if its primary goal is that of being a technical curiosity, I think it can also turn out a handy and usable tool if you have online photos or other images that need a quick edit of some sort.
Many typical transforms like cropping, resizing, rotating are available just as a variety of image filters allows standard adjustments and effects such as brightness/contrast, hue/saturation, grayscale, sepia toning, emboss, blur and so on. There are also some (very) simple drawing capabilities which I plan to expand in the future.
It has some obvious crossbrowser issues due to the usage of the canvas element, which is not available in Internet Explorer. Firefox, Opera and Safari all work to some degree, although some features are limited to the latest (beta) versions.
Please note that the browser is not the ideal place to perform heavy work like this, and thus pixel-level manipulating effects (like brightness/contrast, embossing, etc.) can take several seconds to perform, if not more. Performance varies a lot, though, and it only gets better with the newer browsers. Opera 9.5 Beta, FF3 and the latest WebKit nightlies all perform well, I think. Opera 9.27 is pretty slow, FF2 is "ok". Regular Safari 3.1.1 works fine as well, but lacks a few methods which unfortunately disables saving and many of the advanced effects. Apart from being significantly faster, several canvas-related issues have also been adressed in the betas, so I definitely recommend using those.
You can upload images either from your computer or from a URL (currently only from Flickr, Photobucket, Facebook and PicasaWeb), and you can save the edited image to your desktop or have a temporary URL generated. I don't have a whole lot of space on my host, so the temporary URLs are only valid for 5 minutes, just enough to post it to another site or what have you. When uploading, the file has to make a trip to pixastic.com before being served to the client since security restrictions prevent accessing image data from images outside pixastic.com. Also, when saving, the data is sent to pixastic.com and back. These two things are the only things that involve a bit of server side code, and it's more or less just sending images data back and forth.
One key feature that is missing right now is some sort of zoom functionality and scrolling in the image area. So until this is implemented, I've temporarily restricted the maximum image size to 1024x1024 (and 1MB, which also ensures that my server space is not filled up with giant images!)
If you're interested, my current todo list for this project is here. It also lists the bugs and issues I'm aware of. There are a couple of bugs that I don't know if I'll address, since they are not present when using the beta version of the browser in question.
There are a few shortcut keys you can (try to) use:
Ctrl+C, Ctrl+X, Ctrl+V performs copy/cut/paste on the currently selected image area.
Ctrl+Z : Undo (There are 10 levels of undo)
Alt+Backspace (or Ctrl+Backspace) fills the currently selected area.
The Ctrl+* keys do not work well in Opera, but you can do Ctrl+Shift+* instead.
What's with the nice/ugly/awesome/crappy GUI, you ask? Well, forever and a day ago I started working on a GUI framework, both for the experience and to have some sort of foundation on which to build a large browser game. The game is currently on hold while I do other things, but I decided to use the GUI part for this little project to see if it was actually usable. I've made a few stupid design decisions, and in its current state its a bit too bulky and sluggish, but I like making button controls and sliders, so I win anyway.
Check it out here, I've also put up a few sample images you can play with. Read more...
Sepia toning and histograms
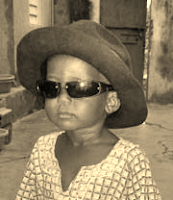
Another quick update. Two more filters for the image effects library. First, a sepia toning effect, since it was so easy. Second, inspired by the demo from John Resig's most awesome Processing port, a histogram filter, which draws a histogram of the grey levels on top of the image.
Play with these and more filters here Read more...
Javascript Image Effects Update

A small update to the Javascript Image Effects script. I've added support for parameters, so a couple of the effects now have options. Ie. the lighten effect now has an "amount" parameter that controls how much to lighten or darken the image. Also one new effect that allows changing brightness and contrast of the image.
Check it out here Read more...
